If your thermostatic radiator valve (TRV) isn’t functioning properly, it can cause uneven heating, high energy bills, or even system breakdowns. Ignoring these issues could lead to inefficient heating, unnecessary costs, and discomfort. Fortunately, identifying the problem and fixing it early can save you from costly repairs and downtime. In this article, we’ll dive into the common problems with thermostatic radiator valves and how to solve them effectively.
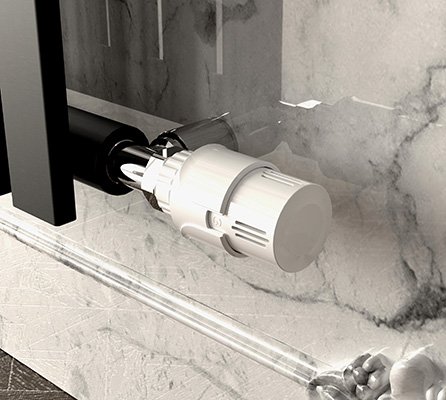
Thermostatic radiator valves are critical for controlling heat in your home or office. When they malfunction, issues like uneven heating, cold spots, and poor pressure control can arise, leading to discomfort and inefficiency.
Having issues with your thermostatic radiator valve? Understanding the root causes of the problems can help you address them quickly and efficiently. Read on to discover the common issues and troubleshooting tips for your TRV.
How to Fix a Sticking Thermostatic Radiator Valve?
A sticking thermostatic radiator valve is a common issue that prevents your heating system from functioning properly. It happens when the valve becomes jammed, causing the radiator to either stay on or off. This can be frustrating, especially in colder weather when you rely on consistent heating.
1. Check the Valve Knob
Start by inspecting the radiator valve knob. The knob should turn smoothly, but if it’s difficult to move, there could be dirt, debris, or corrosion inside. Clean the valve gently using a cloth and ensure the knob can rotate freely. If it’s still stuck, the valve stem or spindle may be corroded, requiring more significant cleaning or lubrication.
2. Clean the Thermostat Head
Over time, dust and grime can build up on the thermostat head, causing the valve to malfunction. Carefully remove the thermostat head, clean it with a damp cloth, and check for any signs of damage. Make sure the connections are secure before reattaching the head.
3. Use Penetrating Oil
If cleaning doesn’t solve the problem, applying penetrating oil to the valve mechanism can help loosen the parts. Allow the oil to sit for a few hours, then gently move the radiator valve handle to see if it becomes easier to turn. Always use a high-quality lubricant that is safe for metal parts.
4. Replace the Valve if Necessary
If your valve is still stuck or corroded, it may need replacing. A radiator valve replacement might seem like a big job, but it’s often the best solution to ensure optimal performance. Always ensure you’re purchasing a high-quality replacement that matches your radiator and heating system specifications.
Why is the Radiator Cold at the Bottom?
If your radiator is cold at the bottom, it’s a clear sign that there’s an issue with the heating system. Typically, this problem occurs when air is trapped in the radiator or if there’s an issue with the valve that controls the water flow.
1. Air Trapped in the Radiator
The most common reason for a cold bottom of the radiator is trapped air. Over time, air can accumulate inside the radiator, preventing hot water from circulating properly. To fix this, you can bleed the radiator using a radiator air valve. Turn the valve slowly until you hear the air escape, then close it once water starts flowing out.
2. Check the Radiator Pressure Valve
If bleeding the radiator doesn’t solve the issue, it might be a pressure problem. A low radiator pressure valve setting can restrict the water flow, resulting in cold spots at the bottom of the radiator. Check the pressure gauge on your boiler to ensure it’s at the correct level (usually around 1.5 bar). If the pressure is too low, top it up according to the manufacturer’s instructions.
3. Check the Thermostatic Valve
The thermostatic radiator valve itself might be malfunctioning, preventing the hot water from flowing into the radiator properly. This can be due to blockages or mechanical failure. If the valve is faulty, it may need to be cleaned or replaced.
How to Turn On a Thermostatic Radiator Valve?
Turning on a thermostatic radiator valve (TRV) is simple, but the process can vary depending on the type of valve you have. Here are some basic steps to follow:
1. Set the Thermostat to the Desired Temperature
Most thermostatic radiator valves have a control knob that allows you to set the desired temperature. Turn the knob to a setting that fits your comfort level. The higher the number, the hotter the radiator will get.
2. Adjust the Valve Handle
If your radiator has a separate valve handle (often on the opposite side of the thermostatic head), make sure it is open. The radiator valve handle should be turned fully to allow water to circulate through the radiator.
3. Wait for the Radiator to Heat Up
Once you’ve adjusted the thermostat and valve handle, allow some time for the radiator to heat up. The TRV will regulate the temperature based on the room’s requirements. If the room reaches the set temperature, the valve will automatically reduce or stop the flow of hot water to maintain a consistent environment.
4. Test the Valve Operation
If the radiator doesn’t heat up as expected, check the valve for any blockages or malfunctions. A radiator pressure valve issue or a stuck valve might be the culprit. If necessary, troubleshoot or replace the valve.
Should Both Radiator Valves Be Open?
This is a common question for many homeowners and professionals dealing with heating systems. In general, it is important to understand how the two valves work together to control the flow of water into the radiator.
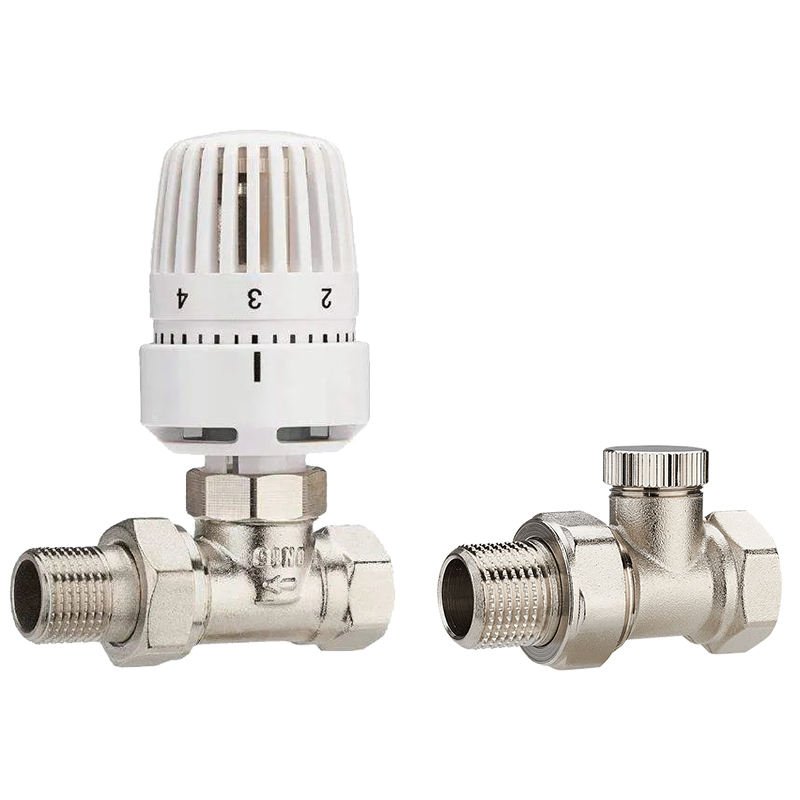
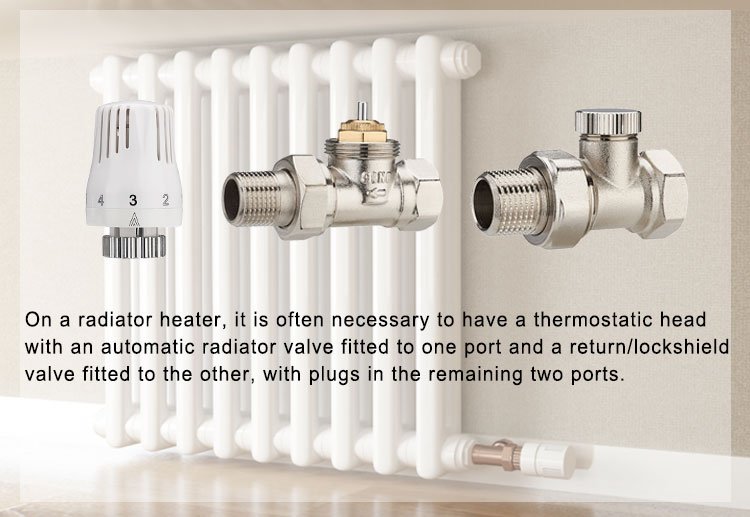
1. The Role of the Thermostatic Radiator Valve
One valve is typically the thermostatic valve, which regulates the temperature by controlling the flow of hot water. The other valve is the lockshield valve, which controls the flow rate and pressure to the radiator.
2. When Both Valves Should Be Open
Both valves should be open during normal operation, but they perform different tasks. The thermostatic valve adjusts the temperature according to your needs, while the lockshield valve ensures the correct water pressure and flow. Having both valves open ensures that the radiator can work efficiently, providing consistent heating throughout the room.
3. When to Close One Valve
In some cases, you might need to adjust or close one valve to balance the heating across multiple radiators in a system. For instance, if a radiator is overheating, you may reduce the flow by adjusting the thermostatic valve or lockshield valve. However, both valves should remain open during standard operation unless maintenance is needed.
Summary
Thermostatic radiator valves are essential for maintaining efficient heating systems. Issues like sticking valves, cold spots, and improper operation can disrupt your comfort. Regular maintenance, proper valve settings, and timely replacements can ensure optimal performance. If you face persistent issues, consider replacing the valve to maintain system efficiency.
Choose IVALVECRAFT, choose reliable partner, enjoy the high quality and best service.